


RoomMate Room Controller
- intuitive control panel
- maximum 20 different controls
- designed for user-friendliness
- 5 different colors
- can also be used as a doorbell
- It fits in every interior
The RoomMate is an intuitive control panel for the Qbus system. This user-friendly room controller features a customizable four-inch screen and supports up to 20 different actions, including switching, dimming, and mood controls. The RoomMate is equipped with a built-in temperature sensor and a proximity sensor, and it can even be used as a doorbell. The display is available in five versions.


Technical info for installers
-
Function description
RoomMate is a fully customizable control panel for the Qbus system, available in various colors and finishes. This user-friendly room control features a built-in temperature sensor and can be used as a room thermostat. The screen automatically activates when approached. Simple actions such as switching or dimming lights, ambiance controls, motor controls, thermostat controls are easily performed. The screen simply connects to Qbus's two-wire bus system. No separate power supply is needed to use this screen within a Qbus system. In addition to the usual Qbus functions, you can also use the screen for controlling compatible audio systems via audiolink in System Manager III. You can configure up to 20 different controls on the RoomMate. The display also visually signals a doorbell and plays an audio signal through the built-in speaker. The proximity detection can be used for controlling a Qbus I/O. The display also has a cleaning function to allow the screen to be cleaned.
The screen can be easily mounted in any standard built-in box with the usual claw or screw mounting and is powered via the bus. A built-in box with screws for switch mounting is preferred. For claw mounting, you must add a set of claws yourself. You need an active internet connection to activate the RoomMate. This internet connection also ensures that the RoomMate is always up to date and has the latest features.
The RoomMate, like every Qbus module, has a unique serial number that is entered during configuration in the configuration software System Manager III. All programmed data remains internally stored in permanent memory.
-
Technical specifications
General Specifications RoomMate
- Ambient Temperature:
- Operating Temperature: 10°C to 45°C
- Storage Temperature: -10°C to 60°C
- Maximum Humidity: 93%, no moisture condensation
- Qbus Bus: 13.8Vdc - 18Vdc very low safety voltage
- Peak Load Qbus Bus without External Power Supply: 300mA
- Peak Load Qbus Bus with External 24Vdc Power Supply: 2mA
- Max. Installation Height: 2,000 meters above sea level
Electrical Protection:
- Qbus Bus: 13.8Vdc - 18Vdc very low safety voltage
- Optional: External SELV 24Vdc Power Supply ZLVS
- Non-toxic, in compliance with WEEE/RoHS
- Overvoltage CAT. III (CAT.3)
CE:
- Qbus declares that this product complies with all applicable European directives and regulations.
- The EU Declaration of Conformity is available upon request.
Physical Specifications:
- Housing: plastic, self-extinguishing in accordance with UL94-V0
- Brass or Aluminum finish
- Protection Rating: IP20, EN 60529
- Installation using supplied mounting frame
- Dimensions (h x w x l): 80mm x 80mm x 10mm
- Weight: approximately 150g.
- Ambient Temperature:
-
Sizing
![RMT Afmetingen]()
-
Explanation of symbols
![Symbool Dubbele isollatie]()
Equipment where protection against the risk of electric contact is not only based on basic insulation but also on additional protection such as double insulation or reinforced insulation. There is no possibility for grounding.
![Symbool Gevaar Aandachtig lezen]()
Before connecting the device, it is mandatory to read the manual of the respective product. ISO7000-0434
![Symbool Gevaarlijke spanning]()
Power supply connection (230V) to the power supply connector. IEC 60417-5036
![Symbool CE]()
CE conformity. All declarations of conformity are available upon request.
-
Warranty provision
2 years from the date of delivery. The warranty becomes void if the module has been opened! The warranty period is extended by 2 years if it was installed by a certified Qbus installer.
In case of defects, Qbus support should be contacted by a certified installer. After registration with Qbus support, the defective module can be sent, unsealed and with a description of the defect, to our Qbus support.
Contact details:
Qbus NV
Joseph Cardijnstraat 19
B-9420 Erpe-Mere
Tel: +32 (0)53 60 72 10
Fax: +32 (0)53 60 72 19
Email: support@qbus.be


General
-
Safety Regulations
Read the full manual before installing and activating the module.
WARNING
- The module must be installed, started, and maintained in accordance with the applicable legal regulations of the country.
- Before working on the RoomMate, power must be turned off.
- Never connect external voltages (e.g., 230Vac) to the connection for the Qbus bus. This will cause irreversible damage to the module and/or connected devices.
- The module must not be opened. The warranty will be void if the module is opened!
Installation and wiring
-
Installation
Screw the mounting frame onto the built-in box. Once the bus connector is connected to the display, click the display onto the mounting frame. Avoid applying excessive force directly onto the display to prevent damage.
![Roommate aansluiting]()
-
Power supply
The display is powered via the Qbus two-wire bus, but can also be powered via an external power supply. An external 24Vdc SELV power supply is preferred when more than 3 RoomMates are connected on a 1A bus and when more than 1 RoomMate functions as a doorbell. The wiring diagram shows the connection of the bus connection and an optional external power supply. When an external 24Vdc power supply is used for multiple RMTs, they must be connected to the same bus. An external power supply should not power RMTs from different buses. If necessary, provide a separate 24Vdc power supply for the RMTs per bus.
-
Bus connection
It is recommended to use the Qbus cable or any other cable with a minimum of 2 conductors of 1mm² as the bus cable. The green shielded EIB cable can also be used if the conductors are paired to achieve a minimum cross-section of 2 x 1mm².

Wiring Diagram
-
Wiring diagram
![Aansluitingen 24 Vdc v2]()

Each modules has an unique serial number. By this number the System Manager recognizes the modules.
This is completely explained in our knowledge center.
After entering the serial number of the Room Mate, the following screen appears:

In the Room Mate, you can set up to 10 pages on which 4 smaller controls (I/Os or scenes) or 1 large control can be placed.
The maximum number of controls per Room Mate is limited to 20.
The choice between 1 or 4 controls per page can be found at the top left.

You can add a new page by clicking on the green + sign at the top right.
You can delete a page by clicking on the red minus sign (the page will be deleted without confirmation)
You can adjust the order of the pages with the up and down arrows that you can find next to the selected page:

As visible in the figure above, you can adjust the name of the page. You can do this by double-clicking on the current page name.
In a first firmware release of the Room Mate, this is not yet shown on the screen itself, but it does make it easier to set the right page.
The previous and next page are shown on the screen by swiping left and right.
At the bottom of the screen, the dots show which page you are on.
In the following example, you can see how the operation of the kitchen page can look like:

A default icon is provided for each type of I/O.
By clicking on the icon, you can make a different choice. For a dimmer, you get the following choices:
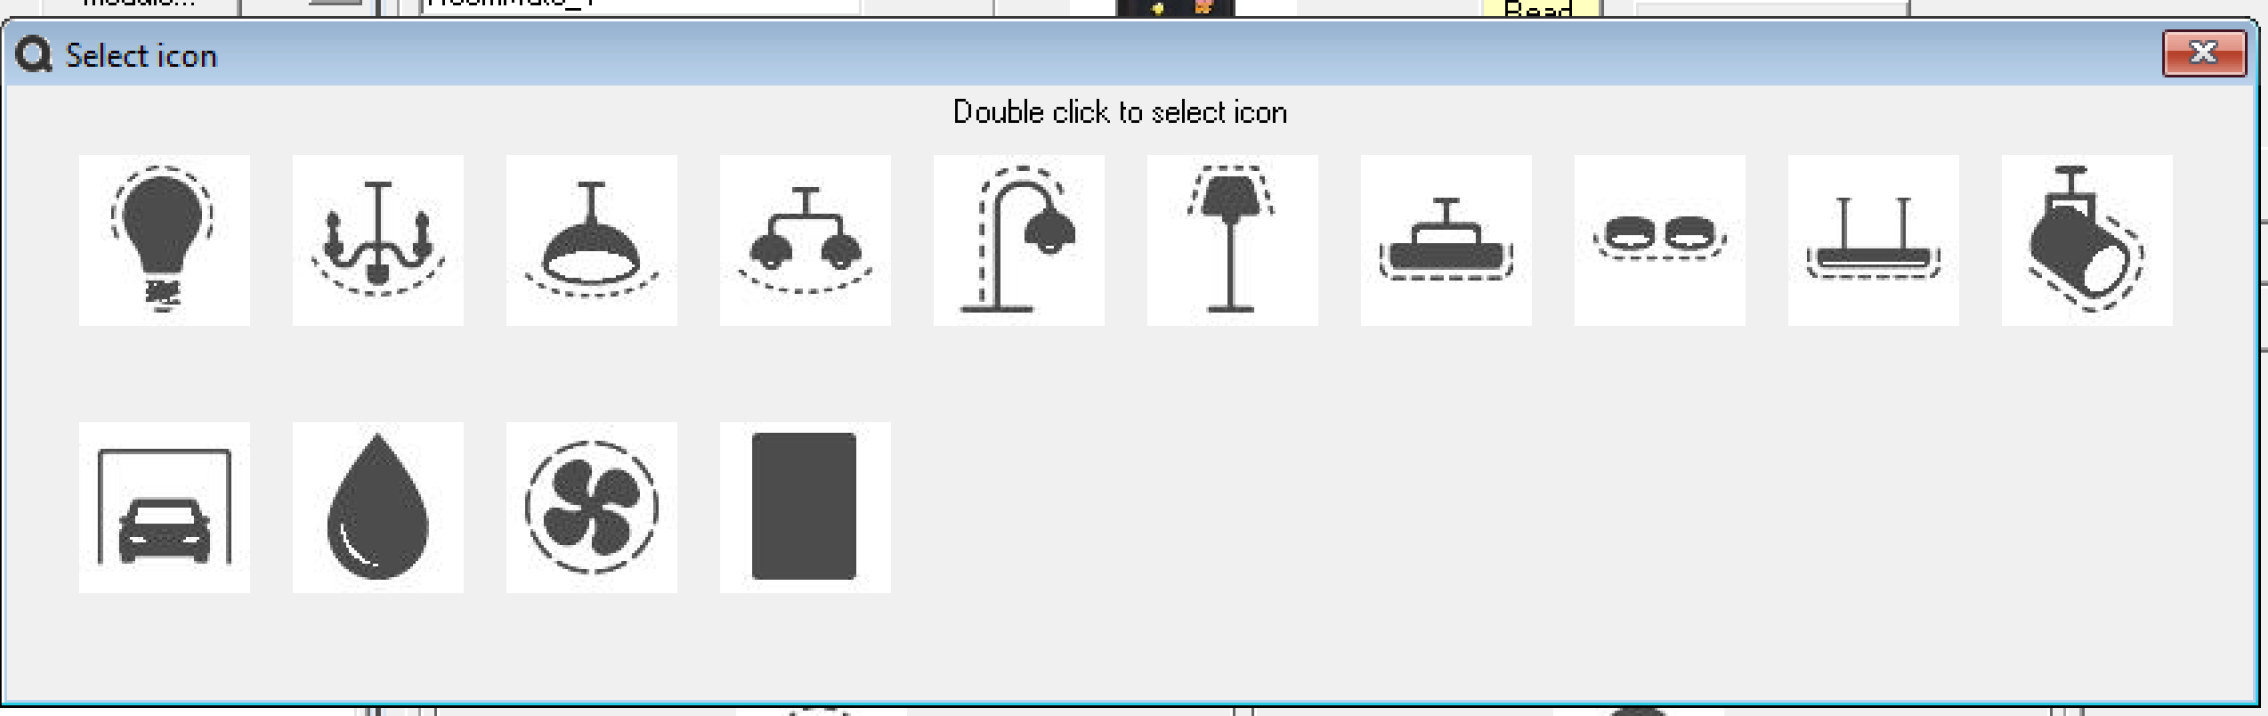
By double-clicking on the desired icon, the choice will be assigned to the I/O.
Note: This list of available icons and the icons themselves are retrieved online from our server.
Note: If you want to make a choice between one of the available icons, the Room Mate needs a WiFi connection.
The WiFi setup screen can be activated on the Room Mate via the settings page that you reach by swiping down on the screen.
When starting the WiFi setup, the Room Mate will be accessible as an access point via http://192.168.4.1
From a web browser on a smartphone, tablet or computer, you can then select the correct available network and enter the correct WiFi key. After clicking on “Save and connect”, the module will restart and connect to the selected WiFi network.
With a correct network connection, all available icons can be selected.
Additional settings
The following screen will appear via the button at the top right:

When the additional thermostat I/O is selected and the option TH -> CTD is checked, the Room Mate will work as a temperature sensor and have the measured temperature processed by the CTD. (see 3.5.6 - Thermostats for more information)
If the box is not checked, the Room Mate will display the temperature of the selected thermostat I/O, but will not measure any temperature itself.
The HVAC I/O will receive the measured temperature and relative humidity from the Room Mate.
When the Doorbell I/O is activated, the doorbell sound signal will be emitted and the clock icon will also be shown on the display until sleep mode is reached.
Your installer is our partner
Do you want to know what Qbus can do for your home or project? Contact an installer in your area or visit one of our showrooms.